Building a website and creating a game plan shouldn’t be complicated today as compared to 10 years ago. It all boils down to what you want to achieve with your site. And once that goal is clear, everything else falls into place. Without taking much time, I’ll tell you how to plan a website on paper in 8 steps that are proven to take off your website to a flying start.
Please keep in mind that we have come up with the simplest solutions which need minimal to no coding at all so that our readers can get off the mark quickly. At the end of this article, you can grab your checklist which you can use while doing these tasks.
STEP 1 – Having A Budget In Mind
Now planning a website, even though much less complicated in today’s age still requires significant capital. It also boils down to the kind of website you’re trying to make, most of our readers we reckon must be interested in making a blog site.
But there are others who plan to put up an eCommerce site or a company site. Even so, the basic principles remain the same but the costing differs when you compare an eCommerce site to a simple blog site.
So the first task is to have a budget in mind. Take any number in your mind which you know can be spent by you without making your wallet lighter. It can be 100$, 200$, and so on. Now just to help you out a bit, you’ll be paying for a domain & for a hosting service, and unfortunately, there’s no way out. Starting a website no matter how simple it may sound will need a small investment from your end.
For your convenience, we have only listed tools & services which are low on cost. Starting a website without any investment is also possible if you’re using WordPress or Blogspot. But the domain will always have their extension and you’ll never go far by using these platforms, especially if you want to earn money from your website.
STEP 2 – Choosing A Domain (Our Trusted Place To Buy Any Domain – Namecheap)
The next and one of the most important steps is to choose the right domain for your site. Don’t take this step lightly and think of just any name, treat your domain name as your company name. A marketable name as a domain is always a step in the right direction, avoid spammy & long words as your domain.
A domain name should be such that your user remembers long after he/she has closed their tab, so name selection should be given time. Choosing a short & memorable domain name is key to building a strong brand. Also, short domain names have an advantage that good-looking logos can be created out of them which again helps your brand immensely.
Our Recommendation
Now, once that is done the time has come to own your domain, for this we recommend Namecheap. Namecheap offers the cheapest domain solution for web developers, and not only it is the cheapest but the services are top-notch too. You can learn more about Namecheap on our full review.
STEP 3 – Choosing A Hosting (Our Recommendation – Siteground)
So the domain name is selected so now what’s next? Well buying a domain is like owning a nameplate of your house, but you don’t have a house yet to put it on! So the next crucial step is to buy hosting so that you can assign your domain to it. Hosting is normally given for a period of one, two, or three years by hosting companies.
And even though purchasing a three-year hosting is always cost-effective, if your budget doesn’t allow, go for a one year plan and upgrade it later on. For hosting our recommendation is Siteground, you can read our in-depth review of Siteground here.
To explain our readers, unlike a domain name; for hosting the cheapest isn’t always the best option. This is because a variety of factors like your website uptime, site speed, etc come into play. And they are dependent on what kind of hosting service you’re using. Believe me, the last thing you should worry about is your website uptime & speed, smart site owners always have this sorted out beforehand.
Our Recommendation
Siteground though is a hosting provider which is not only one of the cheapest in the industry but their servers are strong enough to take care of any sort of website you build on them. After using a lot of hosting services I believe Siteground trumps them all in both cost-effectiveness & deliverability.
Bluehost is another option, though not as quick as Siteground their plans are attractive and will also give you a free domain once you sign up with them.
STEP 4 – Choosing A Theme
With domain & hosting sorted out, think of yourself as a property owner but you haven’t built your house yet, how will you do that? Your answer is choosing the right theme for your website. We assume that you’re doing this all by yourself so theme selection will be key. Even if you don’t have any coding experience it won’t matter much as building a site from scratch is very much possible.
Depending on the type of website you own, whether it’s an eCommerce, blog, company, or an affiliate site you’ll need a suitable theme to work on. These themes are premade so all you have to do is install them into your WordPress, select your favorite theme, and customize it the way you want.
If your budget doesn’t allow it, you can start with free themes. Free themes are good for a start but soon you’ll realize that you need to spend a little bit for a paid theme. As the free ones have limited functionality and will not make your site seem professional enough.
At first, it can be a bit overwhelming and complicated when you start with a theme. But within a few days of getting your hands dirty, you’ll be able to build the site for yourself. Youtube tutorials if watched can speed up your process for building the sites. All you have to do is put the theme name + tutorial and search it on youtube, you’ll get to see tons of tutorials on it.
Our Recommendation – Generate Press
We recommend Elegant themes if you’re looking for a beautiful and interactive website. If your main aim is site speed and you don’t need a lot of elements then it is best to try Generate Press. Generate Press is the fastest theme right now and is a perfect fit for blogs and affiliate sites.
You can read our full review on Generate Press here.
STEP 5 – Plan Out And Build The Content Around It
This can be your first step as well as building the content is the single most thing that will ensure your victory in this game. CONTENT IS KING is an overused term but this holds true for anyone running a site. Even if you do all the other things right and if your content is not on point then be prepared to lose every single time.
Launching an empty site with zero content is a super bad idea so the least we suggest is at least 5-8 articles. With appropriate keyword research, you’ll need to identify your very first set of articles. Once you have finalized that it is time to write your own content.
If you have the resources to outsource your content, great. But for someone not having the money to spend don’t lose heart as with practice you can easily crank out 800 – 1000 words a day.
Your content plan will include several things –
- Content title
- Content length
- Tone Of Your Article
The title should be catchy and to the point. The content length can be based on how long your competitors are writing for that particular keyword. The tone of your article can be set as a friendly, formal, or conversational tone whichever suits you the best.
STEP 6 – Plan The Site Structure
Your content is ready and all your tools are in place. So before going into the tedious process of building the site, it is best you take a step back and decide on your site structure. A lot of people spend days figuring out the perfect site structure and honestly, this shouldn’t take you more than a day.
Site structure simply revolves around the names and the number of pages, menus, footers you want for your site. A good responsive site has anywhere between 3-5 menus and an About Us & a Contact Us page. Your aim should be to make your website as clutter-free as possible so make sure you choose your menus wisely.
This whole process becomes a whole lot easier when you have already selected a theme for yourself. This way you can plan the site structure using that theme as a reference. Other little elements like social media widgets, footers, etc can be edited according to your needs as you are into the building phase.
STEP 7 – Building The Site
Now comes the most important & crucial step, which is site-building. Now depending on the type of your site/blog, you will have to choose a suitable theme. Now I assume you already did that so once you have selected a theme go ahead and install it in your WordPress site. Now just to give you a heads up WordPress is where most of the websites are on the internet.
Once the theme is installed you’ll have to customize your site the way you want it to be. To help yourselves with it you can watch some theme tutorials on how to customize your site as we discussed above.
Site building presently doesn’t need coding at all and you can do it all by adding/removing the elements. Make sure your site is not live and your under-construction page is on while you’re doing the building work. Also, the content you have created will also be added at this point. So make sure your content is added and formatted to give your users a better reading experience.
TIP – Don’t rush trying to build the site, if you’re doing it for the first time it might take you around a week’s time to build a perfect site but that’s okay.
STEP 8 – Review The Site Before Launch
Once you believe you have built your ideal site you shouldn’t be in a hurry to launch it. You should at least hold it off for a day to do a review. By review I mean a manual check done by you wherein you go through all the pages on your website and see if everything is fine or not.
Remember your review is not only for the desktop but it is for your mobile as well. So a manual review on both your desktop and your mobile is recommended. Sometimes the site looks fine on the desktop but not so fine on the mobile and vice versa, you need to make sure you have it covered.
You can ask your family members or friends to take a look as well to get different feedbacks. Check whether the social media handles that you added are pointing to the right pages. Check for the content, whether it is properly formatted and showing up on your site or not.
Another thing to keep in mind is the site speed, see whether it is loading fast or not. There is no point in launching a website that is lagging in speed. Make your manual checks on both mobile and desktop, and if the site is running slow, diagnose it, and make sure it is running fine.
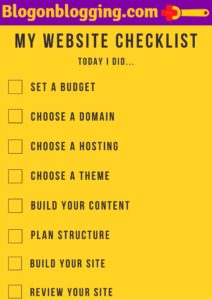
Grab Our Checklist Below!
We have created a custom checklist for you, print this out, and use it as a checklist. Finish your tasks one by one and tick it off as you go, this will give you a sense of accomplishment towards your goal.